Showing posts with label flashcards. Show all posts

How to Use Scrivener's Cork Board

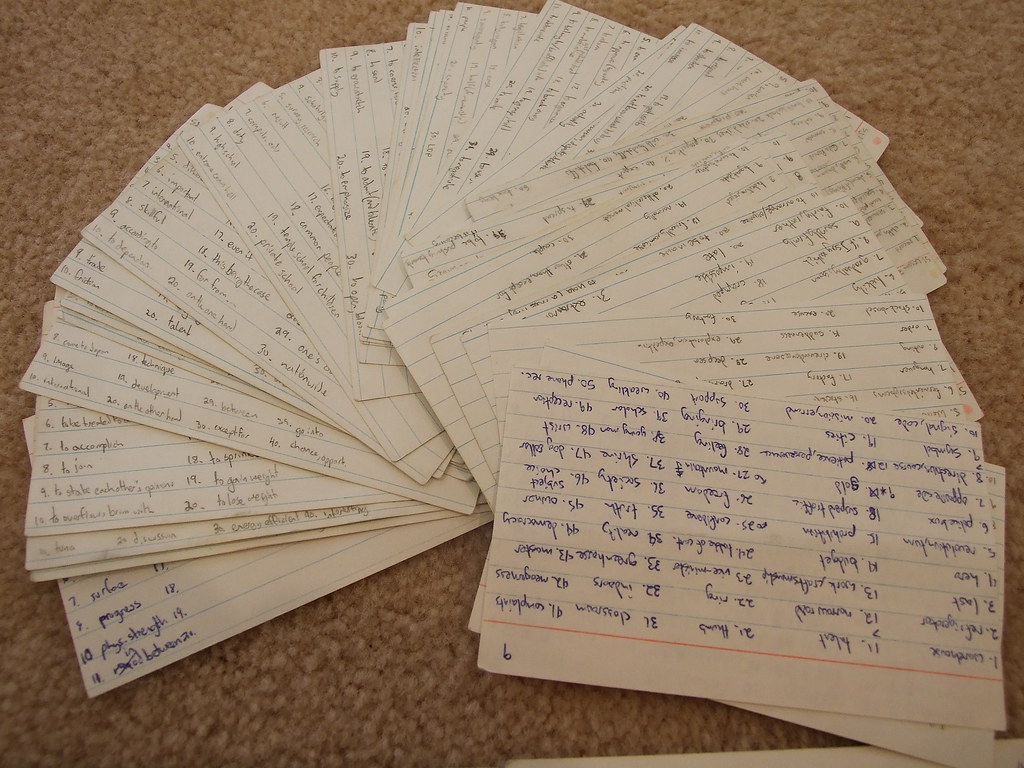
If you’ve been reading this blog for a while, chances are likely that you know my love of flashcards. Or rather, my love of plotting with flashcards. For me, flashcards to plotting is the cheese to my macaroni (that is to say, yum). 

So now that I’ve officially written a full manuscript from first plot bullet to final polished word in Scrivener, I’d like to share with you my favorite feature of all time: the cork board.

The cork board is actually the feature that sold me as far as buying Scrivener goes, and what I love about it is that it allows me to combine my plotting with flashcards method that I’ve grown to adore over the years, with the simplicity and beautiful organization of the computer. (Plus the lack of cramping hands is a pretty nice bonus, too).

So when you open up the cork board view in Scrivener, it looks a little like this:


Or rather, it looks like that if you have some plot points and blurry Photoshop magic at your disposal. But you get the idea.

On the left, you have a list of all of the flashcards on the board. Every flashcard can be titled, with a little summary section that you can fill in while plotting. I use this to lay out my initial plot long before I’ve written a single word in the WIP.

As you write up flashcards, you can move them around, re-title them, delete them, or label them. The manuscript in the screenshot above is a dual-POV MS, so I repurposed the labels to mark the POVs of my two POV characters, which allowed me to keep an eye on the distribution of the POV while plotting and changing things around later on.

Once you’ve finished plotting and you’re ready to start writing, you can open up each flashcard to look like this:


The great thing about Scrivener is that it works in scenes, so every flashcard you open up and type in will be saved in that card. If you decide during revisions that you need to move a scene earlier or later, you can easily do so by going back to the cork board (or using the menu on the left) and dragging it to where it’s supposed to be. For anyone who’s had to cut and paste a scene from one section of an MS Word doc to another, I promise you this is a million and two times easier.

So that’s basically it. Scrivener’s cork board is simple, the organization is beautiful, and quite frankly, I hope to never have to plot without it again.

Have you played around with Scrivener’s cork board feature? If so, what did you think? 

Twitter-sized bites: 
Not sure how to use Scrivener's cork board? Writer @Ava_Jae shares her love for this great plotting tool. (Click to tweet)  
Do you use Scrivener's cork board feature? Share your experience at @Ava_Jae's blog. (Click to tweet

How to Write Through the Unknown

Photo credit: Johnson Cameraface on Flickr
With many WIPs that I’ve plotted out, I’ve found that I eventually hit the Dreaded Scene. Most times, this isn’t a scene that I dread because of the content (ergo: I don’t feel like writing this)—it’s a scene, and often an important one, that intimidates me because I’m not entirely sure how it’s going to happen.

If you’ve been a reader of Writability for some time (or have dug through the archives), then you may remember that I once wrote about how to plot with flashcards. I still use flashcards for plotting purposes, I just use virtual Scrivener flashcards rather than physical pile-on-the-desk cards.
The reason I mention this, is that while I swear by this type of plotting, it does mean that I don’t plot my scenes in detail—instead, I’ll have a couple sentences summarizing the action.

This works wonderfully, because it gives my characters room to stretch and make their own (sometimes unexpected) decisions within the framework of the semi-plotted scene. It does, however, have a downside, namely the Dreaded Scene.

This is probably partially my fault, but oftentimes while I’m plotting I’ll know that something especially important has to happen, but I can’t figure out for the life of me how. I’ll work out everything before and after that point, and I’ll get a general sense for what happens, but as for the details? I figure I’ll work it out later.

Inevitably, later comes when I’m writing and I hit the Dreaded Scene, and I’m still not sure how to work it out.

This is a how to post, however, because I’ve found that the best way to eliminate the dread and get through the scene is to sit down and force myself to figure it out. And as you may or may not have guessed, I use brainstorming lists to do so.

I head the list with the issue that I’m stuck on with the Dreaded Scene, in the form of a question, usually something along the lines of How does x happen? From there, I brainstorm as many possibilities as I can come up with. As is often the case with these kinds of exercises, the key is not to censor yourself, and write down even the most ridiculous of ideas. Once you have a significant list, you narrow it down to the more feasible options, and expand from there to detail step-by-step what happens.

You may now be wondering if the step-by-step bit is necessary. This will vary per writer, but I’ve found that when I’m truly stuck, most times it’s because I can’t envision what will happen. Writing down the steps, then, eliminates that problem and allows me to dive into the writing knowing full well how the events will unfold.

As it turns out, it’s significantly easier to break through a block when you know what lies on the other side. Go figure.

Have you ever encountered the Dreaded Scene? If so, what did you do to overcome it? If not, have you ever plotted or brainstormed with flashcards or lists? 

Twitter-sized bites: 
Stuck on a scene in your WIP? Here are some steps to breaking through the block. (Click to tweet
Do you ever get stuck while writing? Here’s one writer’s strategy to beating the Dreaded Scene. (Click to tweet)

Writing Tool: Scrivener

Photo credit: Mine
I'd first heard about Scrivener something like a year and a half ago when some wonderful writing tweeples mentioned it to me. At the time, I was a Microsoft Word person, and while I knew there were other word processing programs out there, I'd used Word for ages and I didn't see any reason to switch programs. I did take a brief (read: exceedingly brief) look at Scrivener, but I didn't really give it much of a chance.

Over time I started to realize that this Scrivener program was actually more popular amongst writers than I'd initially anticipated. Some of my favorite authors like Veronica Roth and Beth Revis used Scrivener and it seemed that no matter where I turned, a writer somewhere was raving about Scrivener.

So I gave it a second shot and decided to play around with the cork-board feature to do some brainstorming for a potential WIP idea I had. That initial Scrivener test turned into a full outline for said WIP, and I had a revelation—I sort of liked Scrivener.

Unfortunately then my laptop died and took Scrivener (and the files) with it.

My new computer did not have Word installed, but after a couple months I downloaded a Scrivener trial again. And now that I've been using it to write, I have to tell you I sort of still like Scrivener. A lot.

Scrivener makes it easy for you to consolidate all of your writing notes in one place—everything from your initial outline (which, by the way, allows you to brainstorm on virtual flashcards, which I love), to character and setting sketches, to random notes about your WIP, can all be saved into a project that is the novel you are working on.

Even better—it encourages you to think in scenes or chapters, which makes the intimidating process of having to write an entire novel much more manageable. Writing a novel doesn't seem quite as scary when you break it up into bite-sized chunks.

I've only just scratched the surface with Scrivener, but between it's fantastic brainstorming capabilities, note consolidation and distraction-free writing modes (can you say beautiful, focused full-screen mode?) it's quickly becoming one of my favorite programs to use for writing.

Have you ever used Scrivener? If so, what did you think? If not, what word processing program do you use?

How to Plot with Flashcards

Photo credit: konrad.lawson on Flickr
Once upon a time I read Your First Novel 
by Ann Rittenberg and Laura Whitcomb. I felt a little silly buying it because at the time I’d already written four novels so it wasn't really going to help me write my first, but hey. Why not?

It was full of useful information for both pre-publishing and after publishing (although it was written before the explosion of e-books, so I suppose it’s a little out of date in that sense, but it’s still useful if you'd like to try to get an agent). The most useful technique I got from it however, has nothing to do with agents.

It’s a plotting technique. With flashcards.

So I don't remember the exact method the book uses (it’s been a while since I've read it), but I've found that the flashcard method is very useful, which is why I'm sharing it with you.

SO. How to begin? 

Step 1: Build MOUNT DOOM (with flashcards, of course).

Step 2: Get your handy-dandy writing pencil. Or pen. Or crayon or marker or Sharpie or lipstick tube, whatever suits your fancy, really.

Step 3: Plot! Plot like the wind! It doesn’t matter where you begin, just take a flashcard and write down a scene idea. It could be something short like, “Katie kicks a clown in the shin at her birthday party.” or something much more complex like, “Alfredo discovers his albino gerbil is really an alien that’s going to take over the world with his army of adorable fuzzy creatures and tries to tell his mother but all she does is give him a handful of prayer beads.” Ok, so that wasn’t that complex, but you get the idea.

Step 4: Keep writing flashcards. The book recommends you have at least twenty before you try to start writing your novel because chances are you don’t have a fully fleshed-out story if you can’t even come up with twenty scenes. I agree. Write as many flashcards as you can. The more the merrier.

Step 5: SPREAD ‘EM (the flashcards, I mean). If you have a hugenormous desk or table, spread your flashcards out there. Otherwise spread them out on the floor, it’s just as effective. They don’t even necessarily have to be in order, the idea is to just look and see what you have so far.

Step 6: Line them up! Ok, I know I just said order doesn’t matter, but that was Step 5. This is Step 6 and now order matters (don’t question my logic). Once you have them organized, take a look at your time line. Ask yourself what you could add. Are there any gaping holes in your plot? Do you have two or three slow scenes in a row? Is there enough leading up to the climax? For some reason, looking at it visually like this helps me see flaws in my plot faster than just writing up an outline.

Step 7: KEEP. WRITING. FLASHCARDS. I know you can add more in there. Try to shove in at least five more. You can always take them away again later.

Step 8: Numbers! Once you’re satisfied with the order of your scenes, go through and write a number at the bottom based on their order (the first card is 1, the second 2… so on and so forth).

Step 9: Throw them in the air and do the IT’S RAINING FLASHCARDS dance! Ok, not really. But shuffle them. And if you want to shuffle them by throwing them in the air and rolling around in flashcards, that’s totally cool, too.

Step 10: Re-organize! Take a look at your random order. Obviously some scenes will need to be in the beginning and some in the end, but can you keep any of the new arrangements? What would happen if you kept mixing your scenes up? Try experimenting as you put them back in order—flip some scenes around and play with them until you’re happy with your new order.

Step 11: Now go write.

So that’s it guys, the flashcard method unveiled. Give it a try! Maybe you’ll like it as much as I do. Or maybe you’ll have fun dancing in a papery rain. Either way it’s worth a shot.

I’ve shared my method, let’s hear yours! What techniques do you use to plot?
Related Posts Plugin for WordPress, Blogger...