Showing posts with label Scrivener. Show all posts

How to Manipulate Scrivener Labels

So last week I participated in #YAGetsStuffDone on Twitter, which was a tag that lasted a week and encouraged goal-setting and cheering each other on to get their goals done. One of my goals was to finish plotting a project I'd barely started brainstorming, which I did both in Word and Scrivener simultaneously, writing the synopsis in Word and transferring it over to Scrivener on scene cards to get everything ready for drafting.

When I finished on Saturday, I posted my results, which looked like this:


A lot of people appreciated the color coding, as I did (it's so pretty to look at!), and some asked how to change the colors around in Scrivener, so I figured I'd write a quick post about it.

You can do color coding for a whole host of things—for two projects I drafted with chronically ill characters, I used the colors to signify different pain levels, for example—but I most often use it when I'm drafting a dual or multi-POV novel.

When writing a multi-POV novel, each color signifies a different POV. I like to do it this way because it helps me visually see the spread of different POVs, so no one character gets too much (or little) screen time. This is especially helpful in the brainstorming stage because it forces me to think about whose POV each scene will take place in and why.

Luckily, manipulating the labels in Scrivener so I can do this quickly is really easy.

  1. Right click an index card —> Label —> Edit...

  2. Open Meta-Data Settings. Here you can change the name of your labels, add more labels, remove some labels, change the colors by double-clicking the color box, etc. As I said, I do one label per POV character, but however you set it up is up to you. Once you're done, click "OK."


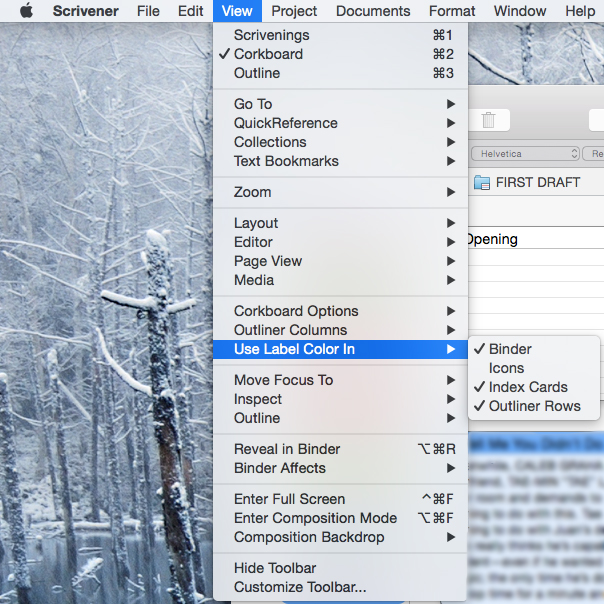
  3. View —> Use Label Color In —> Pick your settings. I like to check off Binder, Index Cards, and Outliner Rows, so the index cards change colors and so do the labels in the row of scenes. If you want the little index card icon to change colors too, then you can also check off "Icons" but I don't usually bother with that.

And that's it! From there, whenever you want to change the label (or color) of the index card, you just Right click —> Label —> [Pick your label]. The colors will change automatically as you go label to label. 

It's that easy and the results are not only visually pleasing, but helpful for organizational purposes. I definitely recommend it if you like to add a little splash of helpful color to your outlines. 

Note: Like many Scrivener features, I'm not sure if all of this is available in the Windows version. It might be! But it might not. I have the Mac version so I'm not sure.

Have you ever used the label feature in Scrivener?

Twitter-sized bite:
Want to color-code your outline in Scrivener? @Ava_Jae breaks down an easy way to do so. (Click to tweet)

On Combining Two Ways to Plot

Photo credit: erstwhile ungulate on Flickr
Over the weekend, I finished first drafting my fourteenth manuscript. It was short—like, under 50,000 words short—and I'm legitimately not sure I'll ever take it out of the drawer ever (right now I have a 50% trunk-without-editing rate), but it accomplished what I most needed: a distraction and reminder that yes, I'm still capable of first drafting something totally new thank you very much.

I'm not going to lie, though—plotting this WIP was really hard. So hard that I actually took a break halfway through and put it away for several months before I opened it up and looked at it again.

The thing is, as completely necessary as pre-plotting is for me before I write even a single word of the WIP, it's not exactly the easiest of processes. With this most recent WIP I sort of forgot about one of the two plotting processes I've played around with that maybe would've made the experience a little easier, but for my next project I think I'm going to combine my two methods.

The methods I'm talking about are:

  • Scrivener cork board. So I've described this method before in my On How I Plot a WIP and How to Use Scrivener's Cork Board posts, so I won't go into super detail here, but it basically involves writing brief summaries of every scene in your planned book, each on a separate flashcard that gets "pinned" to the cork board. Some scenes are more fleshed out than others, but I write just enough for me to understand the gist of what has to happen in each scene. This is the only method I did for the last WIP I plotted, and yes, it worked, as it has worked in the past, but I found it more difficult than the previous two projects I'd plotted, which involved a combination of this method and...

  • Pre-draft synopsis. So I know on paper this sounds like voluntary torture, but I have been pleasantly surprised to find that writing the synopsis before I've written the book is a million times easier and more enjoyable than writing it after. Go figure. (I've written about this discovery in this post.) But basically this is exactly what it sounds like—opening up a document and writing however many pages you need to go step by step through what will happen in your book. 

In the past, when I've combined the two it usually involved having both Scrivener and Word open at the same time. (I don't know why my brain insists on writing a synopsis in Word when Scrivener is perfectly capable of handling both the outline and synopsis, but whatever, brains are weird.) I'd write the synopsis part first, expanding more and more as I go along, and gradually transfer over what I had to the flashcards, which I would later need for first drafting. Both times I did this I managed to finish fully plotting the projects in a week or less. 

Would have been nice if I'd remembered that while plotting the last project, but I digress... 

Sometimes playing around with new strategies or combining ones you have can be extra effective, which is why I'm sharing it with you guys. After all, you never know what methods will work best for you if you don't try new strategies here and there. 

Have you tried either of these methods for plotting? 

Twitter-sized bite: 
Looking for a new way to plot? @Ava_Jae shares a combination method you might want to try. (Click to tweet)

How to Import Word Comments into Scrivener

Photo credit: MIKI Yoshihito (´・ω・) on Flickr
UPDATE: I have since learned (thanks to a commenter and some experimenting) that you can skip ALL of this and just copy and paste. Who knew? Clearly not I. Happy Scrivener-ing!

Up until basically last week, I was under the impression that it was impossible to auto-import CP comments from Word into Scrivener. And so, I would sit for hours, importing CP comments by hand—that is, retyping them into Scrivener.

When I received my CP comments for the latest WIP, however, I knew there was no way I’d be able to do that this time. Because there were over 1,300 of them. (Yeah.)

So I had a choice: either edit entirely in Word (which, I mean, was an option, but not my favorite one), or spend a ridiculous amount of time importing by hand, which I’d pretty much already decided wouldn’t be worth it.

Or was there another choice?

After doing some internet scouring, I came across this post on importing documents from Word into Scrivener. I’d seen the post before, and already knew the process described in the post didn’t import comments, but this time my Google search directed me into the comments on the post…where I found my answer: RTF files.

After some playing around, I managed to figure it out with a little help from the post. And so here's the process I used:

  1. Open all documents containing CP notes in Microsoft Word. For me, that was three documents this time. The reason you need to open everything in Word first, is before you import to Scrivener, you need to merge all of your documents with CP notes into one Word doc. Which is a thing! A very useful thing. Anyway...

  2. Go to Tools > Track Changes > Compare Documents.

  3. Choose two of your documents. You will now see this menu:


    If you want to attempt to preserve the tracked changes your CPs suggested, then choose the document with the most tracked changes as “Original document.” I will say, however, this attempt to preserve tracked changes is somewhat futile as it gets messed up when you import to Scrivener anyway. So up to you. 

  4. Click “OK” and save your new document. Word creates a completely new document now with the comments from both of the documents you just “compared.” Save this document, then repeat this process as many times as you need (using your new merged document with the next one you want to merge with). 

  5. Save your final document as an RTF. Once you have your brand new, shiny document with all of your CP comments in one place, save your file as an RTF. This is what you’ll be importing into Scrivener.

  6. Open your project in Scrivener. Self-explanatory. 

  7. Go to File > Import > Files…

    And choose your new RTF file. This will bring in your newly merged document into Scrivener, with all comments intact. YAY! 

Some caveats:

  • You will have to redistribute your chapters or scenes into separate Scrivener scenes again. When you initially import, it’ll all be in one ginormous Scrivener scene, so you’ll have to reorganize however you had it before you compiled it into a Word document. This is a little annoying, but relatively easy and totally worth it, IMO. 

  • Tracked changes will be a mess. So this is a more significant downside—you’re going to lose a lot of the tracked changes your CPs suggested, both because they get messed up in the Word merge, and because Scrivener doesn’t recognize tracked changes. Instead, Scrivener will automatically try to implement the tracked changes that remained intact in the merged document, which is a bit of a headache because it doesn’t implement it correctly and it’s not marked, so you kind of just have to catch them.

    I didn’t know that when I imported, so I suspect I’ll be catching them for a while. I think, however, if you go through your Word document and fix all the tracked changes there before you import into Scrivener (and, even better—before you merge the documents in Word), this shouldn’t be a problem. I’ll be doing that in the future. 

  • All of your comments will be imported as if they came from the same person. As in, they’ll all be the same color. Which isn’t a big deal to me. I plan to color code mine differently once I’ve brought my comment count down to a manageable number. 

  • If two (or more) CPs comment on the same line their comments will be merged. You’ll be able to tell, because there won’t be a space between the end of CP 1’s comment and the beginning of CP 2’s comment. I actually don’t mind this—it lets me see multiple opinions in one CP box, and it’s I found it pretty fun when all three of my CPs commented on the same thing. 

So that’s it! I hope this saves you some time in getting Word comments into Scrivener. I know I, for one, will never be manually importing comments again.


Twitter-sized bites: 
Ever wonder how to get Word comments into Scrivener? Writer @Ava_Jae share the process she uses to do just that. (Click to tweet)  
Did you know you can import Word comments into Scrivener? Writer @Ava_Jae explains one method of doing so. (Click to tweet

How to Use Comments in Scrivener

Photo credit: kukkurovaca on Flickr
Once upon a time, I used to think Scrivener didn't have much of a commenting system, and then I discovered the truth and it basically changed how I approach revisions forever. Because it turns out Scrivener's commenting system is pretty fabulous.

As it's not one of Scrivener's frequently spoken about features, I'm thinking I'm not the only writer who didn't know much about it, and so I thought I'd share exactly where to find them, and how to use them.

Here we go:

By default, Scrivener’s right-hand sidebar is set to Project notes, where you can leaves notes for referencing while you work on your book. There are, however, other greatly underutilized sections in that sidebar, and comments are one of them.

  1. Click the comments icon (a speech bubble with an “n” and an asterisk). It looks like this:


    Congratulations! You have now opened the Comments & Footnotes sidebar. It’s pretty magical, let me tell you. 

  2. Highlight whatever text you want to leave a comment on. This part is just like Word—the first step to commenting is highlighting whatever line or word you’re going to comment on. Easy! 

  3. Click the add comment button. It’s the one that looks like a yellow speech bubble. See below:
Voila! You can now leave yourself comments. But there’s more!

  • You can change the colors of the comments. This is probably my second favorite part. I like to color code by CP (although, when I have a crazy high number of comments, that doesn’t always happen). This time I’m thinking about possibly organizing types of comments by color because colors are fun. Anyway.

    The steps for changing colors are pretty easy. You right click whatever comment you want to switch the color of and then choose from the following menu.


    You can even set a custom color, if you want! It’s pretty schnazzy. 

  • When you click on a comment in the sidebar, it jumps to the spot in the manuscript. I said colors were my second favorite part, because this right here is what makes Scrivener comments better than Word comments, in my opinion. If you have your whole manuscript selected, you can view all the comments in your manuscript in the sidebar and when you click one, it’ll jump to that spot. Or if you have just one chapter open, it’ll show you all that comments in that one chapter. Or whatever other selection you make.

    This makes organization really easy, and also allows you to jump around and make changes however your heart desires, as well as giving you a general overview of the comments in your manuscript. 

Now, there are two pretty big downsides of Scrivener comments. Or one a half.

Firstly, as far as CP purposes go, track changes in Word is way superior. In Scrivener, there is a sort of track changes thing, but it basically just changes the colors of changes you make (which I like! But isn’t all that useful for seeing what changes your critique partners recommend). Also, as far as I can tell, you can’t import tracked changes, so you’ll have to make the changes manually anyway.

Second, up until yesterday I thought it was impossible to import comments from Word into Scrivener. But! I have figured out a way and I will share that with you guys on Friday (UPDATE: the post is live). This is still a half downside though, because the process is far from perfect and has some caveats. Still.

All of that said, I still love using the comments feature in Scrivener, and so the caveats are worth it to me. You may agree, or you may not, but I think it’s worth experimenting with. :)

Do you use Scrivener comments? Do you have any tips?

Twitter-sized bites: 
Did you know Scrivener has a commenting system? Writer @Ava_Jae breaks down where to find it & how to use it. (Click to tweet)  
Love Scrivener? Writer @Ava_Jae discusses why she prefers Scrivener comments over MS Word & how to use them. (Click to tweet)

How to Set Up Writing Goals in Scrivener

One of my favorite aspects of NaNoWriMo in my pre-Scrivener days was it’s ability to calculate how many words you needed to write a day to complete your NaNo goal. This was something I’d always calculated by hand before, so to find a program that did the math for me? Awesome.

You can imagine, then, my joy upon discovering that the very same auto-calculate feature is on Scrivener for Mac. Except it’s a tad bit better, because you can customize it to your needs.

Unfortunately this feature, as of this writing, is still a Mac-only feature. But my hope is this will someday change and I’d guess that when it does, the process will be pretty similar. So.

For my Mac friends with Scrivener! Here’s how to set up your very own writing goal within the program:
  1. Go to Project > Show Project Targets.

  2. Select the word goal (highlighted in blue) and type in your word count goal for your manuscript.

  3. Go to Options…
  4. Select your deadline.

  5. Check “Automatically calculate from draft deadline.” 
  6. If you won’t be writing every day of the week, choose what days of the week you plan to write on.
  7. If you want to write on the day of your deadline, make sure that’s checked off. 
  8. Click OK.
And that’s it! Now every time you write, you can check how many words you need to keep to your goal by looking at “Show Project Targets” (which is under the Project menu, in case you forgot). And at midnight, it recalculates every day (assuming you did step 5) to keep you on target.

I especially love the auto-calculation, because when you miss a day, it adjusts for you so you can easily see what you need to do to make it up over time. And on the other side, when you write more than you need to, it’s pretty gratifying to see the number of words you need to meet your goal slowly decrease over time. :)

UPDATE (6/20/14): I've been told while Windows doesn't have the full functionality shown above, it DOES have a project target section that allows you to set a word goal. So everything before Step 3 works in Windows. Yay!

Do you use this feature on Scrivener? 

Twitter-sized bite: 
Do you have Scrivener for Mac? Writer @Ava_Jae shares how to set up your writing goals within the program. (Click to tweet

Scrivener’s Version of Track Changes

Photo credit: Joe in DC on Flickr
Remember that time I said that I didn’t know if Scrivener had a track changes feature, but I suspected it probably did and I hadn’t found it yet and my Scrivener n00bness was showing?

Well, I was right—Scrivener does have a track changes feature. Or at least, it has it’s own version of it, and I happen to have fallen in love with it.

This is what the first 250 words of my most recently completed MS looks like in Scrivener:
As you may have guessed, those beauteous rainbow colors aren’t there for aesthetic appeal (although they are pretty)—every color represents a round of editing. Blue for the second round, followed by green, then orange, then purple. First round of edits show up red, but I turned the color off while I was editing before I realized how much I like the colors. Anyway.

It’s ridiculously easy to do: on a Mac, you just head on over to Format (in the top menu bar) and choose Revision Mode > First/Second/(etc.) Revision.

What I really like about this system is that I find it really gratifying to scroll through my revised MS and see all the changes I’ve made laid out in beautiful, color-coded organization. It reminds me just how much work has been done with each revision. Plus, if you get tired of the colors, or want to export without having to change the text color in the final document, you can easily remove the colors by selecting Format > Remove Revisions.

And that’s it. Simple, easy and organized.

Do you use Scrivener? What’s your favorite feature?

Twitter-sized bites:
Do you use Scrivener? Here's a quick how to featuring Scrivener's version of track changes. (Click to tweet)  
Do you edit in Scrivener? Here's how to use it to color code your editing rounds. (Click to tweet

How to Use Scrivener's Cork Board

If you’ve been reading this blog for a while, chances are likely that you know my love of flashcards. Or rather, my love of plotting with flashcards. For me, flashcards to plotting is the cheese to my macaroni (that is to say, yum). 

So now that I’ve officially written a full manuscript from first plot bullet to final polished word in Scrivener, I’d like to share with you my favorite feature of all time: the cork board.

The cork board is actually the feature that sold me as far as buying Scrivener goes, and what I love about it is that it allows me to combine my plotting with flashcards method that I’ve grown to adore over the years, with the simplicity and beautiful organization of the computer. (Plus the lack of cramping hands is a pretty nice bonus, too).

So when you open up the cork board view in Scrivener, it looks a little like this:


Or rather, it looks like that if you have some plot points and blurry Photoshop magic at your disposal. But you get the idea.

On the left, you have a list of all of the flashcards on the board. Every flashcard can be titled, with a little summary section that you can fill in while plotting. I use this to lay out my initial plot long before I’ve written a single word in the WIP.

As you write up flashcards, you can move them around, re-title them, delete them, or label them. The manuscript in the screenshot above is a dual-POV MS, so I repurposed the labels to mark the POVs of my two POV characters, which allowed me to keep an eye on the distribution of the POV while plotting and changing things around later on.

Once you’ve finished plotting and you’re ready to start writing, you can open up each flashcard to look like this:


The great thing about Scrivener is that it works in scenes, so every flashcard you open up and type in will be saved in that card. If you decide during revisions that you need to move a scene earlier or later, you can easily do so by going back to the cork board (or using the menu on the left) and dragging it to where it’s supposed to be. For anyone who’s had to cut and paste a scene from one section of an MS Word doc to another, I promise you this is a million and two times easier.

So that’s basically it. Scrivener’s cork board is simple, the organization is beautiful, and quite frankly, I hope to never have to plot without it again.

Have you played around with Scrivener’s cork board feature? If so, what did you think? 

Twitter-sized bites: 
Not sure how to use Scrivener's cork board? Writer @Ava_Jae shares her love for this great plotting tool. (Click to tweet)  
Do you use Scrivener's cork board feature? Share your experience at @Ava_Jae's blog. (Click to tweet

Discussion: What's Your Favorite Word Processing Program?

Photo credit: vkotis on Flickr
I am writing this post in Pages. This is normal for me, as I transitioned from writing posts in Word to writing posts in Pages sometime last fall. At the time it was mostly out of necessity—my new computer didn’t have Word and it was less expensive to buy Pages than to buy the whole of Microsoft Office.

After I was gifted with a copy of Office, however, I’d expected that I’d go back to my Word-using days and that would be the end of it.

Except it wasn’t.

I can’t fully explain why I still use Pages to write my blog posts. I tried switching back to Word, but it felt weird—the format was different, the posts looked different and I found I was more comfortable writing my posts in Pages, as I’d become accustomed to. However, while Pages has become my blog post writing go-to software, I don’t use it for novel writing or editing.

I’ve written a post on why Scrivener is awesome in the past, so I won’t reiterate the whole thing, but basically I’ve found that Scrivener is my favorite software for first draft writing and major plot structure changes, largely because of the cork board and daily writing goal features. As I start to get into critiques and more detailed edits, however, I switch over to Word.

Maybe there’s a commenting feature in Scrivener and I just haven’t found it, but Word is a pretty universal program and I have yet to find software to beat it’s commenting system. I love that I can color code my comments by CP and perhaps the habit-forming part of me doesn’t want to let go of Word after using it for years as my novel-writing software. I still translate all of my changes back to Scrivener (copy and paste is a beautiful thing), but for final edits, at least so far, I like to use Word.

So I’m weird and I switch around between Pages, Scrivener and Word, but now I want to hear from you: what word processing programs do you use, and which is your favorite? 

Writing Tool: Scrivener

Photo credit: Mine
I'd first heard about Scrivener something like a year and a half ago when some wonderful writing tweeples mentioned it to me. At the time, I was a Microsoft Word person, and while I knew there were other word processing programs out there, I'd used Word for ages and I didn't see any reason to switch programs. I did take a brief (read: exceedingly brief) look at Scrivener, but I didn't really give it much of a chance.

Over time I started to realize that this Scrivener program was actually more popular amongst writers than I'd initially anticipated. Some of my favorite authors like Veronica Roth and Beth Revis used Scrivener and it seemed that no matter where I turned, a writer somewhere was raving about Scrivener.

So I gave it a second shot and decided to play around with the cork-board feature to do some brainstorming for a potential WIP idea I had. That initial Scrivener test turned into a full outline for said WIP, and I had a revelation—I sort of liked Scrivener.

Unfortunately then my laptop died and took Scrivener (and the files) with it.

My new computer did not have Word installed, but after a couple months I downloaded a Scrivener trial again. And now that I've been using it to write, I have to tell you I sort of still like Scrivener. A lot.

Scrivener makes it easy for you to consolidate all of your writing notes in one place—everything from your initial outline (which, by the way, allows you to brainstorm on virtual flashcards, which I love), to character and setting sketches, to random notes about your WIP, can all be saved into a project that is the novel you are working on.

Even better—it encourages you to think in scenes or chapters, which makes the intimidating process of having to write an entire novel much more manageable. Writing a novel doesn't seem quite as scary when you break it up into bite-sized chunks.

I've only just scratched the surface with Scrivener, but between it's fantastic brainstorming capabilities, note consolidation and distraction-free writing modes (can you say beautiful, focused full-screen mode?) it's quickly becoming one of my favorite programs to use for writing.

Have you ever used Scrivener? If so, what did you think? If not, what word processing program do you use?
Related Posts Plugin for WordPress, Blogger...